Medical Simulation
The articles on this page reflect my personal experiences and interests in medical simulation. Please note, if you are going to link to this page or any of the articles within, that this page changes often with additions and corrections. In the future it may be moved or broken into several pages to make navigation easier.
- New! Handbook for Healthcare Simulation Operations Specialists
- Creativity in Medical Simulation
- Non-staining Povidone-iodine substitute for medical simulation
- Using Cyanoacrylate adhesive to repair vinyl components
- Reuse of disposable items in simulation
- Voice Transformer
- Cyranoids: Does sentence structure, vocabulary, and semantics matter when playing a simulated patient?
Creativity in Medical Simulation
Creativity is essential in simulation if we are to keep the learners' minds engaged. The brain craves the new; for more about this see "Perceptual Pleasure and the Brain" by Irving Biederman and Edward A. Vessel, American Scientist, May-June 2006, Volume: 94 Number: 3 Page: 247. For suggestions to improve your creativity see my Fostering Creativity guide (one page, printable PDF, 79kb). You might find this talk by David M. Kelley interesting: How to build your creative confidence (click on video right) at TED.com. David Kelly is a professor at Stanford's d-school and the founder of the design firm IDEO.
Non-staining Povidone-iodine substitute for medical simulation
Povidone-iodine is often used to prepare sites for medical procedures (i.e. catheter insertion) or as a surgical scrub. The distinctive brown-orange colour is useful in visually showing the area has been prepared.
Regular povidone-iodine solution will permanently stain the skin of many mannequins and partial task trainers used in medical simulation. The solution presented here looks like povidone-iodine but will not stain the vinyl skin. It is simple and inexpensive to compound.
- 40mL Crosse & Blackwell Gravy Browning
- 150mL water
- 40mL glycerin
- 5 drops of hand dish washing detergent
- 20mL isopropyl alcohol (70%)
Mix the gravy browning and water thoroughly before adding the glycerin. Now add the dish washing detergent and then mix in the isopropyl alcohol. The browning, by itself, has a cool brown colour. It is not exactly like povidone-iodine, which is a warm-brown/orange colour, but is close enough for simulation. Store at room temperature. Shake well before use.
Please note that this mixture may NOT work with every mannequin and partial-task trainer. Before using test on a small, inconspicuous area to be sure that it does not stain. In the original formulation I used FD & C #40 red azo food colouring to more closely approximate the colour of povidone-iodine. This food colouring is often used to colour simulated blood for use on mannequins. I found this food colouring left a faint pink stain on some types of vinyl surfaces. The stain was easily removed by scrubbing with a paste made of sodium bicarbonate and water.
The brand of gravy browning used, Crosse & Blackwell, does not contain any spices; only caramel colour, water, glucose and salt. If you use a different brand, check to make sure it does not contain any spices. You may have to adjust the amount for other brands of gravy browning for the same effect. I have spoken with other simulation specialists and they have used Bovril, with yellow food colouring added, as a povidone-iodine substitute. Bovril contains beef extract and spices in addition to the colouring.
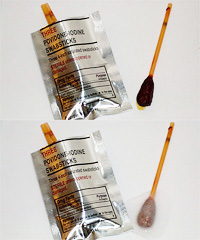
If someone has inadvertently used real povidone-iodine on one of your mannequins, you may be able to remove the stain. Use a solution of sodium thiosulfate and a soft cloth to clean the area. Rinse well with clean water. See the photo to the above right as a demonstration of sodium thiosulfate solution bleaching a povidone-iodine applicator. You can purchase sodium thiosulfate in solution from aquarium and fish pond retailers. The product I have used is API Tap Water Conditioner.
Using Cyanoacrylate adhesive to repair vinyl components
One of the problems which crops up in simulation from time to time is how to repair tears or rips in the skin of high-fidelity mannequins. It isn't always feasible to replace a vinyl skin from either a time or fiscal standpoint. I've found that using a cyanoacrylate adhesive (trade names: Krazy Glue and Super Glue) is a quick, effective fix.
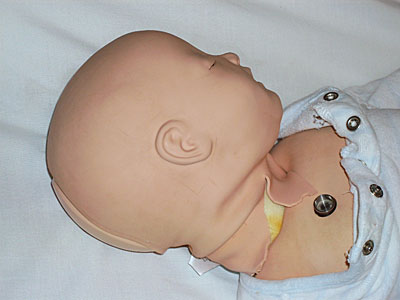
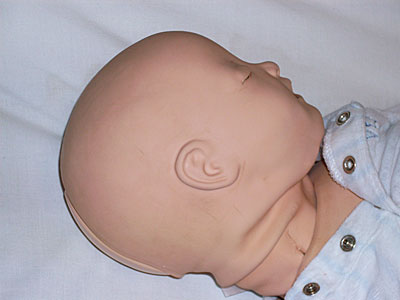
The photos below show a Laerdal SimBaby with a tear in it's neck which I repaired with cyanoacrylate adhesive.The lower part of the repair, near the edge of the neck, puckered a bit when stuck together. I think this was due to the age of the tear. Please note that the mannequin is positioned to show the tear and repair clearly. The repair is hidden by the body skin of the mannequin during normal use.
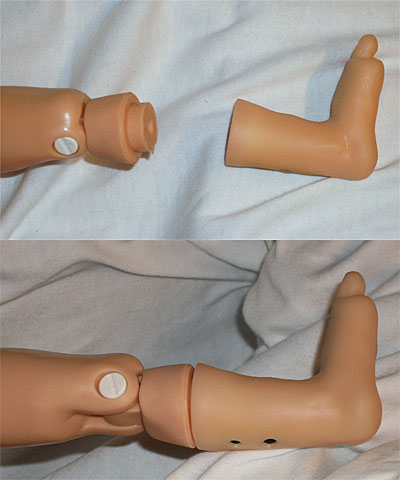
Below right shows a repair to a Gaumard Premie HAL's leg I made with cyanoacrylate. This was suggested by the technician from Gaumard in case we needed to use the Premie mannequin before we received our replacement leg.
Before you begin using cyanoacrylate it is a good idea to learn a bit more about this type of adhesive.
Cyanoacrylate will not fill space: Unlike polyvinyl acetate (PVA) and epoxy adhesives, cyanoacrylate does not fill in space between the two surfaces being bonded. Both surfaces must come into intimate contact with one another for the cyanocrylate adhesive to have maximum strength. This is great if you are repairing a recent tear in something but you will have problems if a chunk of material is missing or the surfaces you are trying to bond are very rough.
Cyanoacrylate will dissolve some types of plastics: The solvent in cyanoacrylate will dissolve some types of plastics such as expanded polystyrene. If you have any doubts, test before you use in an inconspicuous area or a scrap of the material.
Cyanoacrylate will bond your skin to just about anything else: Cyanoacrylate rapidly polymerises in the presence of water and the tissues in your skin are full of water. If you are careless you can quite easily glue yourself to whatever you are working on. You can wear some types of glove such as nitrile or vinyl but don't wear cotton gloves. Cyanoacrylate has a powerful exothermic (heat producing) reaction with cotton fibres.
You can remove cyanoacrylate glue,even after it is cured, with acetone. Acetone-based finger nail polish remover is available from most pharmacies. Be careful when using acetone since it can dry your skin and the vapours are flammable. Work only in a well-ventilated area far away from open flames and other ignition sources.
Reuse of disposable items in simulation
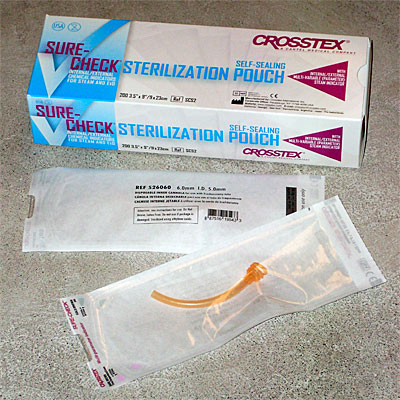
During a scenario, learners may use disposable items to care for their patient. Although these items are disposable they may also be relatively expensive. We found that one item, a disposable inner cannula for a trach tube, was priced at $3 to $4 each. The packaging it came in was difficult to reseal and became grubby, due to repeated handling, very quickly.
To improve the learner's experience we now reseal disposable items in sterilization pouches with realistic labels. These pouches are familiar items and they remind the participant to check for package integrity. At less than ten cents (Cdn) each, these are very inexpensive.
The label is designed in a program like Microsoft word then printed on the pouch with a desktop laser printer. We usually use the information that came on the original label but without the manufacturer's name or logo. In addition, I always clearly label the product "For simulation only" or similar wording. There have been cases of items intended for simulation being used on real patients. The pouches we use are designed for steam sterilization so the heat from the fuser in the laser printer does not affect them. The printer we use has a bypass feeder and a straight paper path so we haven't had any problems.
Voice Transformer
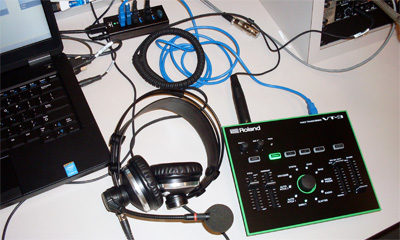

One of the items I'm using frequently these days in high-fidelity simulations is the Roland VT-3 Voice Transformer with the microphone of an AKG HSC-171 headset for input. The VT-3 is an easy-to-use device that changes your voice on-the-fly with no detectable latency. I had tried a software-based solution but it had unacceptable latency which, when combined with the latency in the mannequin software, made it very difficult to use. In the following I'll tell you how I use it and some things I've discovered to help you use it more easily and more effectively in your simulations.
The VT-3 can be powered either through a USB connection to your computer or by a "wall-wart" power supply. Since some of our newer computers don't have a microphone or line-level input, I use the USB for both power and to convert the analog microphone input to a digital output to the computer via the USB. You can, if you wish, process digital audio signals or output the processed sound as an analog signal. There is also a headset output for monitoring the processed sound. There are three sliders which will be of interest to those involved in simulation, these are:
Pitch: The pitch control either lowers or raises the pitch (frequency) of the voice. At the centre point the pitch is unchanged; moving the slider downward lowers the pitch, moving the slider upward raises the pitch. The range is one octave, up or down.
Formant: Formant is a difficult concept to understand so if you really must know see the wikipedia entry for "formant". A simpler, more pragmatic way of looking at it is that changing the formant of your voice will make it either more masculine or feminine. When this slider is centred, the formant of the input is not changed. When the slider is moved up your voice takes on a more feminine character, moved down your voice takes on a more masculine character.
Mix Balance: This controls the ratio of processed voice to unprocessed (natural) voice. When the slider is at the bottom, only the unprocessed voice is output. When the slider is at the top, only processed voice is output. If you can, mixing in a bit of your natural voice helps to reduce the synthetic feel of the processed voice. This works only when you are the same gender as the patient you are playing.
In addition, you'll also use the microphone sensitivity setting (MIC SENS) along with the peak LED; if the LED is constantly on you've got your MIC SENS set too high. The centre dial should be set to "Direct" and the "Manual" button should be lit. Make sure that the REVERB slider is set to OFF or your mannequin will sound like he is at the bottom of a well! If you are using a microphone which requires phantom power, turn on the phantom power switch on the rear of the VT-3. When you use the USB connection for audio there are several points to remember. Download and install the latest driver for the VT-3 on your computer. Make sure that the audio output on your computer matches both the sample rate and bit depth of the VT-3. Check the audio input; it should show something like IN (VT-3), if it shows IN BYPASS (VT-3) or something else change it. I've found that some software will automatically detect the OUT line of the VT-3 and send the audio back to the device. In most cases you don't want this, so set your audio out to whatever you normally use (e.g. speakers, primary output).
Once your VT-3 is connected and you're up and running try it out. One of the first things to realize is that you must be subtle in your use of this tool. It does add a slight synthetic feel to the voice but this is a small price to pay for the ease with which you can create a character. If you overprocess you'll end up sounding like a smurf or darth vader. Experiment with the settings. It is a combination of pitch and formant that gives us clues to the age and gender of the speaker. For more on this topic see Voice and his timbre: individual, gender and age features.
Update: Several months ago we upgraded our computers to handle a new AV system. We installed MorphVOX Pro voice changer by Screaming Bee on all of our new computers. Previously I had tried MorphVOX on our old laptops but the software ran far too slowly to be of any use. With the new computers, the software worked very well and I now use it for simulations. A couple things I like about this software are: it is simple to use and it doesn't require any additional hardware. The changed voice sounds very realistic. If your computers are of recent vintage and are fast, I would recommend this software
I feel that using the voice changer/transformer helps to maintain the fiction contract by obscuring the origin of the voice. Since I do the orientation to the simulation space, the learners can recognize my voice. By disguising my voice, I help to uphold the illusion that the patient is a unique individual, not a merely a mannequin voiced, controlled and directed by someone else. This technology also helps learners to differentiate between patients during the course of multiple scenarios played back-to-back. Overall, I believe that the use of the VT-3 Voice Transformer, MorphVOX, or similar technology can help to increase the immersive nature of a high-fidelity simulation.
Cyranoids: Does sentence structure, vocabulary, and semantics matter when playing a simulated patient?
It would amuse me!
It is an enterprise to tempt a poet.
Will you complete me, and let me complete you?
You march victorious,--I go in your shadow;
Let me be wit for you, be you my beauty!
from CYRANO DE BERGERAC: A Play in Five Acts, Scene 2.X.
by Edmond Rostand, Translated from the French by Gladys Thomas and Mary F. Guillemard
Our use of language; the words we choose, the meaning of those words, and the sentence structure we use depends on when and where we were raised, our age, and our education. If you listen to interviews of people from the 1940s, 1970s and now, you will notice a subtle difference in word selection and sentence structure.
You might expect that the age and cultural background of the actor playing the voice of the simulated patient would break the simulation illusion if there was a difference in these two factors between the actor and the simulated patient. This appears not to necessarily be the case. Stanley Milgram, famous for his obedience to authority experiment in the 1960s, ran a series of experiments in which he had an actor voice the words of another person. He found that even if the disparity in age between the actor, which he called the "shadower", and the source was great, the subjects talking with the actor did not detect anything out of the ordinary. This technique was called speech shadowing and the resultant constructed entity (source + shadower) was called a cyranoid; from the stage play "Cyrano De Bergerac" (see quote above). Milgram never formally published his studies of cyranoids.
In the study quoted below, two researchers from the London School of Economics and Political Science replicated Milgram's experiments in 2014. In the Study 2 referred to was a twelve-year-old boy (the shadower) and a thirty-seven-year-old adult male social psychology professor (the source).
"In both studies, participants’ written and debrief statements provided perhaps the strongest evidence in favor of the cyranic illusion, though analyses of participants’ responses
to agree/disagree questionnaire items also proved convincing. Even in cases involving significant age incongruity between source and shadower (Study 2), participants failed to notice
when their interlocutor was not self-authoring the words he spoke, suggesting that the cyranic illusion is a robust phenomenon not limited to instances of high source-shadower congruence."
Corti, Kevin and Gillespie, Alex (2014) Revisiting Milgram’s cyranoid method: experimenting with hybrid human agents., The Journal of Social Psychology,
online. ISSN 0022 - 4545 (In Press) DOI: 10.1080/00224545.2014.959885 © 2014 Taylor and Francis Group, LLC
Experiments with multiple sources feeding a single shadower were also conducted by Milgram with similar results. The take home point for those involved in simulation is that visual and voice effects matter far more than the content of the speech. The content of our speech does, of course, matter in the context of the scenario. Content alone, even if highly inconsistent with the age and character of the shadower, will not break the simulation.
Copyright © by Barry M. Robinson, Toronto, Ontario, Canada | Privacy Policy
